How to Make Tender Lard Pastries – Easy Recipe with Various Fillings
Learn how to make tender lard pastries – delicious, easy to prepare, and filled with sweet or savory flavors to suit every taste.

Tender Lard Pastries – Easy Recipe with Various Fillings
Course: Snacks, Dessert, SidesCuisine: RomanianDifficulty: Easy30
servings1
hour30
minutes40
minutes178
kcal2
hours10
minutesBy the river, with a basket full of pastries…
I don’t know how that sounds to you, but to me… it sounds deliciously good!
The idea of having something tasty to snack on – something that’s filling yet can double as dessert – always makes me leave home with a big smile on my face. And why not? “Killing two birds with one stone”, as the saying goes – you know it well, and in this case, it fits perfectly.
Tender lard pastries – well, as you already know (and I like to think it’s a good thing), many of my recipes are reinterpretations or even original ones, always sprinkled with a touch of childhood charm. That nostalgic note, whether subtle or obvious, is always welcome – and oh so beautiful when it makes its way into a recipe. And in this case, yes, it’s all about those childhood memories.
Why these pastries?
The story is dear to my heart, and I’ll tell you briefly.
When I was little, there was a river near our house. To make it easier for us to enjoy a good splash, Dad dug out a little spot and lined it with plastic – our very own “pool” without rocks (what won’t dads do for their little girls? 😊). And all summer long, that’s where we spent our time – swimming.
Quite often, we had to take the geese with us (and yes, we did lose them a couple of times… shhhht!), but the best part was that when hunger hit, we didn’t have to go home – we already had our little snack pack.
Oh, if only you knew how good those snacks were… Back then, we didn’t even know what filling was what – Mom always surprised us with different combinations.
So today I’m sharing this delicious recipe with you – packed with flavors, a variety of fillings, a touch of emotion, and, as a bonus, all made with the same tender pastry dough.
Let’s get baking!
(You can also find this recipe on Chef Adrian Hădean’s blog, alongside many other tasty recipes.)
Ingredients:
Dough (adapted from mom’s recipe)
1 cup (250 ml) warm milk1 cup (250 g) rendered pork lard (or butter, 82% fat)
2 eggs
25 g fresh yeast (or 7 g dry yeast)
600–700 g flour (enough to get a soft, non-sticky dough)
1 teaspoon salt
1 egg (for brushing the pastries)
(Optional) 1 tablespoon sugar – if you want a slightly sweet dough for contrast
Savory filling – cheese, olives, and herbs
150 g feta or salty cheese50 g black olives, finely chopped
1 tablespoon dill or parsley, chopped
1 egg (optional, for creaminess)
Topping: caraway seeds
Sweet filling – cottage cheese, cranberries, and vanilla
200 g well-drained cottage cheese1 egg
1–2 tablespoons sugar
1 teaspoon vanilla sugar
2 tablespoons dried cranberries, chopped
Topping: poppy seeds
Sweet filling – plum jam, walnuts, and cinnamon
5–6 tablespoons thick plum jam3 tablespoons coarsely chopped walnuts
½ teaspoon cinnamon
Topping: chopped walnuts and brown sugar
Preparation
- This dough is just like the one my mom used to make — and probably the way many home cooks used to prepare it back in the days when lard was an essential ingredient in tender, yeasted doughs. I chose to make it with lard, but you can replace it with butter, as mentioned in the ingredient list.

- Preparing the Dough
This is a very simple dough to make, and what I love most about it is that, thanks to the fat, it becomes extremely elastic and non-sticky. It’s easy to work with and hassle-free.
In a large bowl, I mixed the warm milk, eggs, sugar (if you want a slightly sweet dough), salt, and melted lard — just warm, not hot. Once everything was well combined, I added the yeast. - I started incorporating the flour gradually. The exact amount may vary depending on the type of flour, but the goal is to obtain a tender, elastic, non-sticky dough that’s easy to shape.
- Proofing the Lard Dough
The rising time may vary depending on the room temperature, but since it’s summer, my dough rose beautifully in about an hour. It became airy, fluffy, and smelled like… cookies. Yes, exactly! - Preparing the 3 Fillings
I won’t bore you with the preparation of each filling separately, because the philosophy is simple: for each combination, just mix the listed ingredients to taste and keep the toppings handy.
Eh, voilà — we’re ready to fill and shape the diamond pastries. - Filling and Shaping the Pastries
After the dough has risen nicely, I rolled it out very thinly, almost like a baking sheet. Along the edge of the dough, close to the border, place a generous row of filling (start with whichever filling you prefer). - The dough is first rolled over the filling and then rolled two more times, forming a tight and compact roll.
The roll is then cut into equal pieces, shaping them into diamonds (just like you would cut layered pastries).
I repeated this process with all the fillings until the dough was finished. - Decorating and Baking
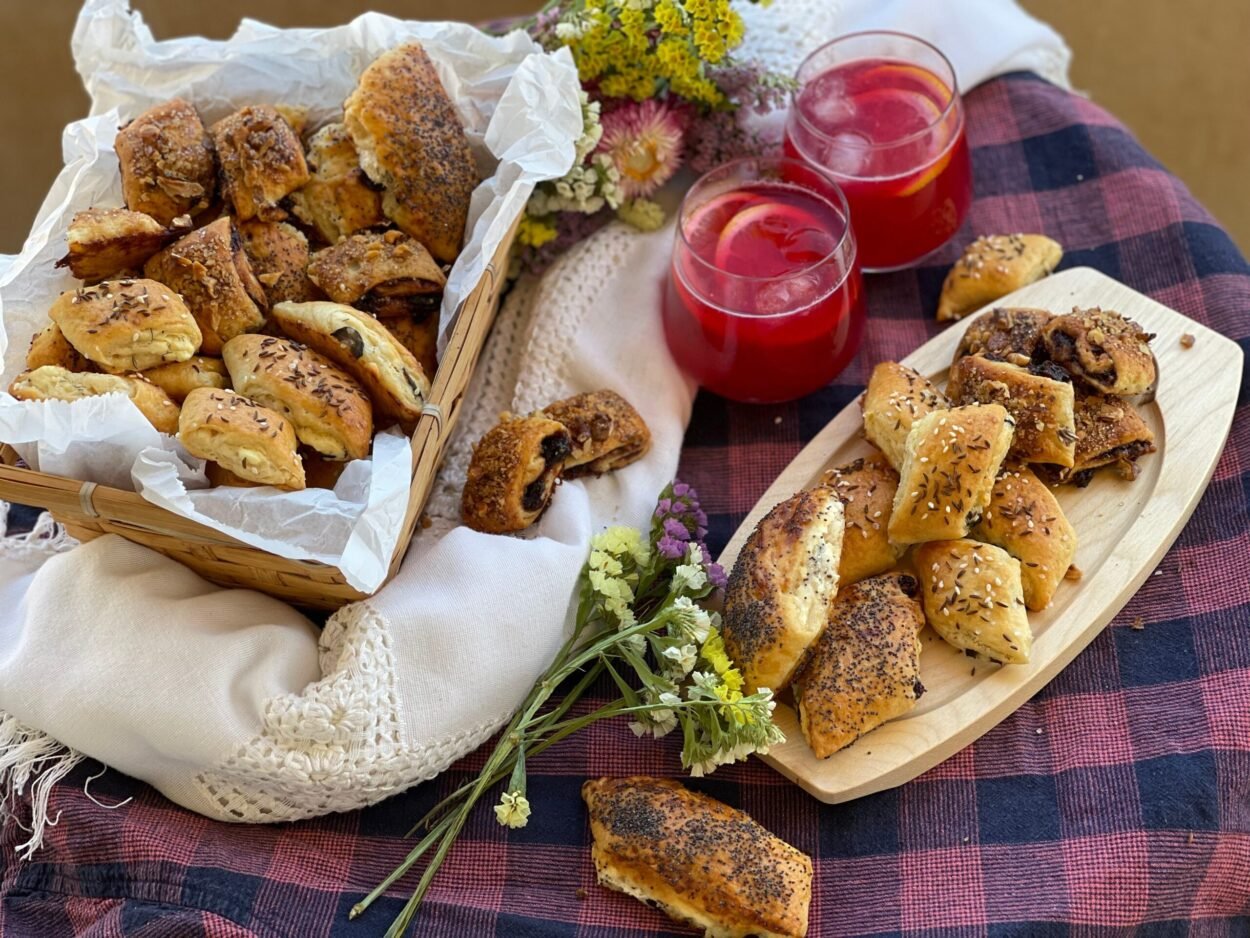
After shaping all the diamonds, I carefully placed them on a baking tray lined with parchment paper. I brushed them with beaten egg to give them a golden, appetizing color, then sprinkled the appropriate seeds: caraway for the savory versions, poppy seeds for the sweet cheese and cranberry ones, and walnuts or brown sugar for the sweet ones. - I got two large baking trays — one with the sweet varieties and one with cheese and olives (my favorite).
I baked the diamond pastries one tray at a time in a preheated oven at 200°C (about 400°F) for approximately 20-25 minutes, until they became golden and fragrant (check after 20 minutes). - Serving Tender Pastries with Lard and Various Fillings
The tender diamond pastries with various fillings are perfect served both warm and cold. I often enjoy them alongside a refreshing berry lemonade or a fragrant tea, especially on sunny summer days.
If you choose only the savory variety, they pair wonderfully with a cold beer — my friends can attest to that.
The sweet versions are a treat on their own, ideal for afternoon snacks or picnics. - Storing the Treats
To keep the diamond pastries fresh, it’s best to cover them with a clean towel after they have completely cooled.
You can leave them at room temperature for 1–2 days. If you want to store them longer, keep them well covered in the fridge for up to 4–5 days.
They can also be gently reheated in the oven at 150°C (300°F) for 5–10 minutes — just enough to regain their original texture. - Closing Thoughts
I hope you enjoyed this recipe for tender diamond pastries with assorted fillings — full of flavor and childhood memories.
I encourage you to try it out and play around with your favorite fillings, because the kitchen is the perfect place for creativity and indulgence!
And don’t forget to share if you want to bring a little flavor and joy into someone else’s life!
Wishing you days filled with smiles and good vibes,
Sending you warm hugs,
Ely